Trusted by Law Enforcement & Tactical Professionals
Blister Treatment on the Trail: Prevention and Care Guide for Hikers
7 min reading time
Master blister treatment and prevention with this hiking guide. Learn proper foot care techniques, emergency treatment protocols, and the supplies that keep you moving.
The Complete Guide to Blister Treatment for Outdoor Adventurers
Few things derail a great hike faster than painful blisters. These fluid-filled pockets of misery can transform an enjoyable trail into an agonizing ordeal, cutting adventures short and causing complications if left untreated. Whether you're tackling a day hike or multi-day backpacking trip, understanding proper blister treatment and prevention is essential wilderness first aid knowledge.
This guide provides proven strategies to prevent blisters, field-tested treatment protocols, and expert foot care techniques to keep you moving comfortably on any terrain.
Understanding Blisters: Why They Form on the Trail
Blisters develop when friction creates separation between skin layers, allowing fluid to accumulate in the gap. On the trail, several factors contribute to blister formation:
Friction from repetitive rubbing between your foot, sock, and boot creates heat and irritation. This is the primary cause of hiking blisters.
Moisture from sweat or wet conditions softens skin, making it more vulnerable to friction damage.
Poor-fitting footwear creates pressure points and allows excessive foot movement inside boots.
Long distances and challenging terrain increase the duration and intensity of friction exposure.
Understanding these causes helps you implement effective prevention strategies before blisters form.
Blister Prevention: Your First Line of Defense
The best blister treatment is prevention. Follow these proven outdoor safety strategies:
Choose Proper Hiking Boots
Well-fitting hiking boots are your foundation for blister-free adventures. Your boots should:
Fit snugly without pinching or excessive movement
Provide adequate arch support and cushioning
Have enough toe room (about a thumb's width)
Be properly broken in before long hikes
Never wear brand-new boots on extended trips. Break them in gradually with shorter walks to identify and address potential problem areas.
Select the Right Socks
Sock choice dramatically impacts blister prevention. Avoid cotton socks, which absorb and retain moisture, creating ideal conditions for friction.
Instead, choose:
Merino wool socks for natural moisture-wicking and temperature regulation
Synthetic blend socks designed for hiking with moisture management
Liner socks under thicker hiking socks to reduce friction
Many experienced hikers swear by the double-sock system: a thin liner sock against skin with a cushioned hiking sock over it. This transfers friction between sock layers rather than against your skin.
Keep Feet Dry
Moisture management is critical for blister prevention. Strategies include:
Changing socks during long hikes when they become damp
Using foot powder or anti-chafing balm before hiking
Hot spots—areas of redness and irritation—are blister warning signs. When you feel discomfort, stop immediately and take action:
Apply moleskin or blister prevention tape to the affected area
Adjust lacing to reduce pressure points
Change socks if they're damp or bunched
Apply lubricant to reduce friction
Addressing hot spots takes minutes but prevents hours of pain. Never ignore early warning signs.
Blister Treatment: Field Care Protocols
Despite best prevention efforts, blisters sometimes form. Proper treatment minimizes pain and prevents infection.
Step 1: Clean the Area Thoroughly
Cleanliness is paramount with any open or damaged skin. Blisters create entry points for bacteria that can lead to serious infections.
Use supplies from your wilderness first aid kit to clean the blistered area with mild soap and clean water. This removes dirt, sweat, and contaminants while preparing skin for treatment—similar to managing other cuts and scrapes on the trail.
Pat the area dry gently with clean gauze or a bandana. Avoid rubbing, which can further damage sensitive skin.
Step 2: Protect Intact Blisters
If the blister hasn't popped, your body has created a natural sterile bandage. The fluid cushions underlying tissue and the intact skin prevents infection.
Leave small, painless blisters intact. Protect them with:
Moleskin cut in a donut shape around the blister to reduce pressure
Blister pads specifically designed for cushioning and protection
Hydrocolloid dressings that create a moist healing environment
Secure protective layers with athletic tape or adhesive bandages, ensuring edges are smooth to prevent additional friction. Change dressings daily or whenever they become wet or dirty.
Step 3: Drain Large or Painful Blisters (When Necessary)
Large, tense, or extremely painful blisters may require draining to continue hiking safely. This decision should be made carefully, as draining increases infection risk.
When to drain:
Blister is large and interfering with walking
Pain is severe and limiting mobility
You have significant distance remaining to hike
Proper draining technique:
Clean the blister area thoroughly with antiseptic wipes
Sterilize a needle or safety pin with alcohol or flame
Puncture the blister edge in 1-2 spots
Gently press fluid out with clean gauze
Leave the overlying skin intact as a natural bandage
Apply antibiotic ointment
Cover with a sterile dressing
Secure with tape, ensuring no wrinkles or bunching
Monitor drained blisters closely for signs of infection: increased redness, warmth, swelling, pus, or red streaks extending from the area.
Step 4: Care for Popped Blisters
If a blister has already burst, treat it as an open wound:
Clean thoroughly with antiseptic solution
Trim away loose, dead skin with sterilized scissors (don't remove skin still attached)
Apply antibiotic ointment
Cover with a non-stick sterile pad
Secure with tape or bandage
Change dressing twice daily or when wet/dirty
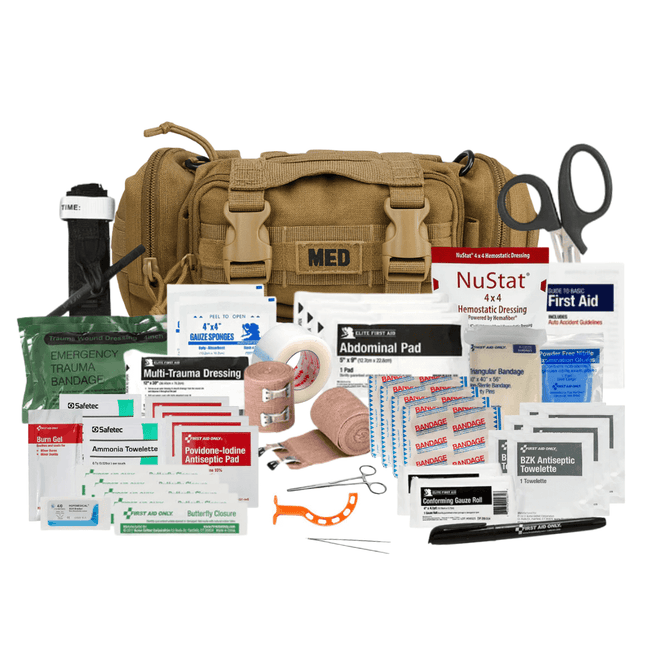
Essential Blister Treatment Supplies for Your First Aid Kit
A well-stocked first aid kit is essential for proper blister treatment on the trail. Include:
Moleskin or blister prevention tape
Hydrocolloid blister pads (various sizes)
Athletic tape or medical tape
Antiseptic wipes
Antibiotic ointment
Sterile gauze pads
Sterilized needle or safety pin
Small scissors
Anti-chafing balm or foot powder
Consider using HSA or FSA funds to invest in premium first aid supplies. ViTAC's field-tested kits contain professional-grade materials designed for serious outdoor adventures.
When to Seek Medical Attention
Most blisters heal with proper field care, but some situations require professional medical evaluation:
Signs of infection (increased pain, redness, warmth, pus, fever)
Red streaks extending from the blister
Blisters that don't improve after several days
Extremely large or deep blisters
Blisters in people with diabetes or circulation problems
Severe pain that prevents walking
Don't underestimate blisters. Untreated infections can lead to serious complications, especially in remote wilderness settings where evacuation is difficult.
Post-Hike Blister Care
Proper care continues after you leave the trail:
Continue cleaning and changing dressings daily
Allow blisters to air out when possible
Avoid activities that stress healing areas
Watch for infection signs
Let skin fully heal before your next adventure
Make Blister Prevention Part of Your Hiking Routine
Integrate these foot care practices into every outdoor adventure:
Break in new boots gradually before long hikes
Inspect feet during breaks and address hot spots immediately
Learn from each hike—note what works and what causes problems
Stay Comfortable, Stay Adventuring
Blisters don't have to end your outdoor adventures. With proper prevention strategies, quality gear, and effective treatment protocols, you can confidently tackle any trail while keeping your feet healthy and comfortable.
Remember: the best blister treatment starts with prevention, continues with immediate action at the first sign of trouble, and includes proper field care when blisters form. Don't let foot pain keep you off the trails—let preparation keep you moving.
Ready to upgrade your trail first aid supplies? Explore ViTAC's expertly curated first aid kits and medical supplies, designed for outdoor enthusiasts who demand reliable, field-tested gear.
In Stock
Domestic Shipping (USA - Lower 48 Only) Orders are processed within 24 hours and typically ship within 1–2 business days. Once shipped, delivery takes an estimated 3–7 days, with most orders arriving in just 5 days. Please Note: We currently do not ship to Alaska, Hawaii, or international destinations. Questions? Contact us anytime at support@vitacsolutions.com or call 307-202-8426.
What are you preparing for? On-duty response, family preparedness, outdoor adventure... Answer 5 quick questions and we'll match you with the right gear.
Cold environments demand deliberate gear decisions. This guide covers the three-layer system — base, mid, and shell — from a preparedness standpoint: how each layer...
Uncontrolled bleeding is the leading cause of preventable trauma death. EMS averages 14 minutes nationally. A firearm stops the threat — only a trauma kit...
We've been downrange. We know what it costs to be unprepared. ViTAC was built by U.S. Army Special Operations veterans to make sure the people who run toward the threat — and the families who depend on them — have gear that works when everything is on the line.
— ViTAC Solutions Founders | 40+ years combined Special Operations experience
Most of our trauma kits and first aid supplies qualify for HSA and FSA reimbursement. Don't let your benefits expire — invest them in gear that could save a life.
The item was as promised. Everything in the kit was high-quality and I’m pleased with that. The only problem I have is I’m not sure it’s worth the cost. I found all of the contents individually for significantly less money. The only thing I didn’t find on my own was the pouch everything came in and that was a perfect fit so I would give it an A plus on quality, but a C on value.
Excellent choice for a one-stop, well-stocked trauma bag
This is a great kit if you're looking for a higher-level bag. The individual pieces are good quality and it packs tightly--that's good but it doesn't leave a ton of room if you want to add anything.