When minutes count, a car trauma kit should focus on one task: stop life-threatening bleeding. Severe hemorrhage can lead to death in as little as five minutes, so a bleeding-control kit belongs in every vehicle rather than a bandage-filled household first aid kit. Officers, medics, outdoor travelers, preppers, and government contractors benefit from vehicle kits that function like compact individual first aid kits. The sections below explain which tools make the difference and why.
Bleeding from major vessel injuries leaves almost no margin for error, so quick tourniquet application or wound packing often determines the outcome. A well-stocked car trauma kit prioritizes proven tourniquets, hemostatic dressings, chest seals, pressure dressings, and nitrile gloves. Those components matter far more after a crash than extra adhesive bandages or small splints.

If you commute, run a fleet, drive off road, or might arrive first on scene, keep a vehicle trauma kit within easy reach of the driver or passenger. Following sections provide a practical checklist, usage tips, storage advice, and training guidance to keep the pack ready and accessible.
What you need to know
These concise priorities will help you choose, store, and train with a car trauma kit that actually addresses life-threatening bleeding. Treat them as a short checklist you can return to when assembling or upgrading your vehicle pack.
-
Prioritize bleeding control: Put hemorrhage control at the top of the list. A car trauma kit should address life-threatening bleeding rather than carry mainly adhesive bandages.
-
Pack the essentials: Include a CoTCCC-approved tourniquet, hemostatic gauze, a pressure dressing, a chest seal, and nitrile gloves. The primary interventions to stop catastrophic bleeding are tourniquet application, wound packing, and sustained pressure.
-
Store for speed: Mount the kit within reach and protect it from heat and moisture. Make sure a bystander or the driver can grab it quickly at the scene.
-
Train and rehearse: Take a Stop the Bleed course and practice applying dressings and a tourniquet. Refresh skills every six to twelve months so your response stays reliable under stress.
-
Choose wisely: Prefer responder-grade components or upgrade a basic kit with proven items. Budget options can work if individual components meet recognized standards and the pack is organized for fast use.

Why bleeding control belongs in your car trauma kit
Most roadside kits are stocked for minor cuts, but vehicle crashes produce injuries that kill quickly. Prioritizing hemorrhage control saves time and lives, so treat life-threatening blood loss before anything else.
Massive arterial bleeding can lead to unconsciousness and death in roughly three to five minutes without intervention. Rapid tourniquet application or wound packing beats cooling or antiseptic for controlling major hemorrhage, and Stop the Bleed training teaches simple, repeatable steps that work under pressure.
Vehicle crashes cause predictable, dangerous injuries that household first aid kits do not address. These include deep limb lacerations, crush injuries, penetrating chest wounds, and partial or complete amputations, all of which can produce rapid blood loss.
-
Tourniquets and hemostatic dressings for extremity and packed wounds. When applied correctly they control arterial and deep soft-tissue bleeding that simple bandaging cannot.
-
Chest seals and pressure dressings for open chest or torso injuries. Chest seals prevent air entry into the chest and pressure dressings stabilize soft-tissue bleeding until professional care arrives.
-
Airway adjuncts, nitrile gloves, trauma shears, and a thermal blanket for stabilization. These items protect rescuers, help keep the airway open, and reduce shock risk while awaiting EMS.
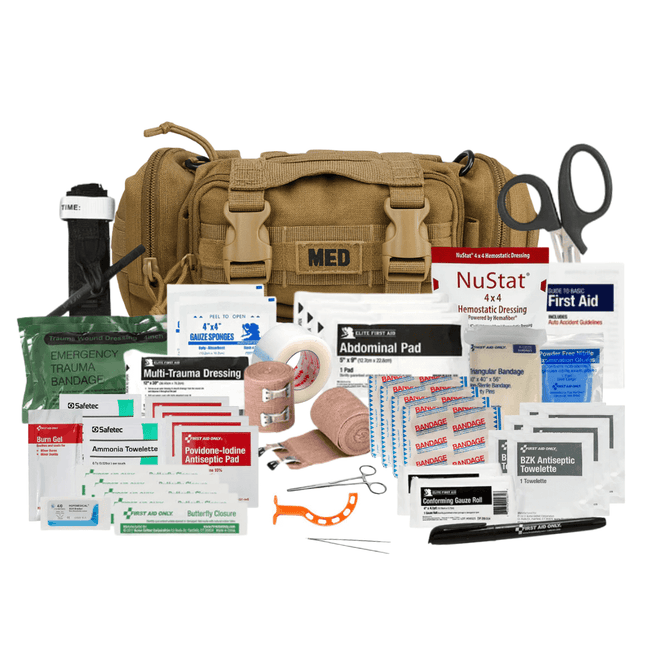
Core items to pack: a car trauma kit checklist for bleeding control
When time is measured in minutes, focus on what stops bleeding and prevents rapid deterioration. The checklist below uses plain item names and recommended counts so you can shop or assemble a reliable car trauma kit quickly. Keep the pack accessible; seconds matter when a limb or chest wound is catastrophic.

Tourniquets are the frontline tool for severe limb bleeding. Use proven windlass models such as the CAT or SOF-T and carry at least one to two per vehicle so you can treat multiple casualties or replace a damaged unit. Include a SWAT-T or similar elastic band as a compact backup for junctional control or improvised applications.
Hemostatic dressings and chest seals stop wounds that are difficult to compress and address open-chest injuries. Pack at least one QuikClot- or Celox-style hemostatic gauze and learn basic wound packing: fill the cavity, apply firm pressure, and secure with a pressure dressing. For penetrating chest trauma, carry paired occlusive chest seals with at least one spare and include both vented and non-vented types to help manage tension pneumothorax risk.
Round out the kit with pressure dressings, personal protective equipment, airway tools, and small stabilization items. Add an Israeli-style pressure dressing, nitrile gloves, trauma shears, nasal pharyngeal airways in two sizes, a thermal blanket, and a compact CPR barrier. These extras turn a basic auto medical kit into a bleeding-focused vehicle IFAK and give you the tools to stabilize a patient until EMS arrives.
Plan your case and mounting location to protect consumables from heat and moisture. The following section explains how to keep these items rapidly accessible and in good condition.
How to use the three life-saving tools in your vehicle IFAK
When seconds matter, a short routine reduces errors. Follow a consistent order so you and bystanders act calmly and effectively.
Put on gloves, expose the wound, and call 911 immediately. Work steadily and speak clearly so bystanders understand the situation and know help is on the way.
Apply a tourniquet deliberately. Place it two to three inches above the wound while avoiding joints when possible, then tighten the windlass until bleeding stops. Secure the device and record the application time on the strap or another visible surface; do not loosen or remove it unless a clinician directs you to. If bleeding continues after a properly applied tourniquet, add a second tourniquet above the first and maintain direct pressure while waiting for EMS. For a concise reference on optimal tourniquet use, see this tourniquet guide.
Packing with hemostatic gauze follows a simple sequence: pack, compress, and secure. Fill the wound cavity tightly so the dressing contacts the bleeding source, then apply firm, sustained pressure for several minutes rather than brief pats. After bleeding slows, bind the gauze in place with a pressure dressing and keep pressure until EMS arrives; do not remove packed gauze to check the wound.
Apply a chest seal by exposing the wound, applying the seal, and monitoring the patient. Clear clothing and blood from around the wound, press the seal firmly around all edges to form an airtight bond, and watch for changes in breathing and consciousness. Needle decompression for a tension pneumothorax is an advanced intervention for trained rescuers only; focus on sealing and rapid transport while keeping the scene safe.

Choose the right kit: budget, family, or responder-grade
Match kit contents to your routine and how many people you might treat. Options range from low-cost upgrades to fully stocked patrol packs.
You can buy a prebuilt pack (see our Emergency Medical Trauma Kits & IFAKs) or convert an existing car first aid kit into one that effectively stops life-threatening bleeding. For a low-cost upgrade, swap in a CoTCCC-approved tourniquet ($25–$45), a roll of hemostatic gauze ($10–$30), and a pair of chest seals ($6–$15). Add nitrile gloves, trauma shears, and a compact pressure dressing and you have a functional roadside trauma kit without a large outlay.
Professional patrol and EMS packs are built for repeated use and speed. Expect multiple tourniquets, several large hemostatic dressings, chest seals, airway adjuncts, NPAs, and organized pouches in a rugged, weatherproof case. Prices commonly range from about $200 to $800 depending on components and case quality.
ViTAC Solutions customizable vehicle kits are a practical midpoint for buyers who want vetted, ready-to-go packs they can tweak. Kits prioritize bleeding control with professional tourniquets and hemostatic dressings, include vehicle mounting options, and provide GovX discounts for eligible customers plus a 30-day satisfaction guarantee. You can swap items so the pack matches your driving profile and expected risks.
Use this quick rubric to choose and customize a kit that fits your routine. Start with a profile below, then add items from the checklist to match passenger count and environment.
-
Daily commuter: a basic upgraded car trauma kit with one tourniquet, compressed hemostatic gauze, and a chest seal. Mount it under the seat for fast access and check consumables regularly.
-
Family road trips: add a second tourniquet, extra dressings, a thermal blanket, and pediatric supplies. Store a larger kit in the trunk for long trips and keep a small grab bag within the passenger area.
-
Off-road adventurer: use a responder-style pouch with higher item counts and waterproof mounting. Secure the pack to avoid loss in rough terrain and include extra navigation and signaling gear.
-
Fleet vehicle: standardize a mid-level kit across vehicles and provide training for drivers. Keep replacement parts on hand and audit kits on a regular schedule.
-
Responder: choose a full patrol or EMS pack with redundancies and a durable case. Organize pouches for rapid access and maintain spare consumables for multiple patients.
Mount, store, and maintain your car emergency trauma pack
Fast access and durable storage can be the difference between life and death. Plan placement and a durable case so supplies remain usable when needed.
Your car trauma kit is worthless if you cannot reach it quickly or if items degrade in heat and moisture. Headrest and under-seat placements are fastest and avoid trunk delays while reducing airbag interference. Door pockets are faster than trunks but may eject in a crash, and trunks are the slowest option for immediate hemorrhage control. For practical placement ideas and pros/cons of common locations, see this guide on where to keep a first aid bag in your car.
Choose a case that fits the mounting location and protects contents from heat and crush forces. Hard-shell polycarbonate cases resist crush and higher temperatures, while low-profile MOLLE pouches tuck under seats and into cargo nets without rattling. Look for a high-visibility color, quick-release straps or grab handles, and drainage to avoid trapped moisture. Avoid soft sealed bags that can trap heat against adhesives and chest seals.
Keep consumables fresh with a simple schedule and routine visual checks. Hemostatic dressings typically last two to five years unopened, sterile gloves two to five years, and many tourniquets are rated five to ten years. QuikClot manufacturers and industry reports have noted shelf-life considerations for hemostatic products and updates to storage recommendations; see the QuikClot five-year shelf update. For general guidance on kit expiration and how to manage consumable timelines, consult this overview on emergency kit shelf life.
Perform quarterly visual inspections of seals, straps, and expiration dates, and run an annual audit to replace expiring items. Replace anything immediately after use or if it shows visible damage.
Install mounts that match your chosen location: Velcro headrest panels for quick grab-and-go, Quick Fist clamps for roll bars, or bolt-on and cargo-clip brackets for trunks and cargo areas. Anchor the pack so it will not become a projectile and add a reflective tag for night visibility. Test the mount with a firm pull to ensure the pack stays secure during routine driving and sudden maneuvers.
Train, practice, and what to do first at a crash
Training turns a kit from gear into lifesaving action. Practice builds the reflexes you need when stress is high.
Take a Stop the Bleed course and add hands-on practice so you build confidence. Classroom knowledge is useful, but real skill comes from packing wounds and tightening a tourniquet under time pressure, and skills decay quickly without refreshers. Plan to refresh training every six to twelve months to keep muscle memory sharp. For a practical refresher, see our First Aid Fundamentals: Bleeding Control & Trauma Tips primer.
On scene, follow a short, fixed sequence: make the scene safe, call 911, expose the injury, and stop life-threatening bleeding first. Apply a tourniquet for severe limb hemorrhage and pack junctional or deep wounds with hemostatic gauze as trained. Once hemorrhage is controlled, address airway and breathing interventions consistent with your level of training.
Know the basics of Good Samaritan protection and consent so you reduce hesitation. If a patient is conscious, ask for permission; if unconscious, the law usually allows you to provide care. Record tourniquet application time clearly on the patient or your notes and keep a brief handover for arriving emergency personnel.
Finish with a practical checklist: pick or build a kit, mount it within reach, schedule training, and add maintenance reminders to your calendar. Treat training and monthly checks as routine so the response becomes reflexive during a real event.
Make your car trauma kit stop bleeding, not sit unused
A kit earns its value when it gets used correctly. If you haven't checked yours recently, do it now.
When a crash happens, seconds matter and severe bleeding can be fatal within minutes. Build and store your car trauma kit around three essentials: a proven tourniquet, hemostatic dressing, and a pressure dressing, and practice those skills until they become automatic. Today, locate where a kit would live in your vehicle, replace any expired items, and either order a ready-made vehicle IFAK or assemble one from the checklist above.
Tags
bleeding control
CAT tourniquet
chest seals
crash response
emergency preparedness
EMS
first aid
hemorrhage control
hemostatic gauze
IFAK
pressure dressings
QuikClot
roadside emergency
roadside safety
Stop the Bleed
tourniquet
trauma kit
trauma training
vehicle IFAK
vehicle safety