Wound Closure Techniques: Complete Guide to Butterfly Strips, Steri-Strips, and Advanced Methods
10 min reading time
Wound closure techniques have evolved from simple butterfly strips to advanced options including Steri-Strips, surgical glues, and dissolvable sutures. Learn proper wound closure methods, when to use each technique, and how to prevent infection and scarring for cuts and lacerations in emergency situations.
Wound Closure Techniques: Essential Knowledge for Emergency Care
Wound closure techniques are critical skills for anyone providing emergency medical care, whether you're a first responder, outdoor enthusiast, or prepared civilian. Properly closing wounds prevents infection, promotes faster healing, and minimizes scarring—but choosing the right method depends on wound size, depth, location, and available resources.
From traditional butterfly strips to modern Steri-Strips, surgical adhesives, and dissolvable sutures, today's wound closure options offer effective solutions for various injury scenarios. Understanding when and how to use each technique ensures you can provide appropriate care when accidents happen.
This comprehensive guide covers the evolution of wound closure methods, proper application techniques, advantages and limitations of each option, and how to stock your emergency medical kit with the right supplies.
Infection Prevention
Closed wounds create a barrier against bacteria, dirt, and contaminants that cause infections. Proper closure significantly reduces infection risk compared to open wounds.
Bleeding Control
Bringing wound edges together helps control bleeding by reducing the surface area exposed and promoting clot formation.
Faster Healing
Wounds heal more quickly when edges are properly approximated (brought together), allowing tissue to regenerate across smaller gaps.
Reduced Scarring
Proper wound closure techniques minimize scar formation by ensuring edges heal flush rather than creating raised or widened scars.
Pain Reduction
Closed wounds are less painful than open wounds because nerve endings are protected and movement doesn't repeatedly stress injured tissue.
Butterfly Strips: The Foundation of Field Wound Closure
Butterfly strips (also called butterfly bandages or wound closure strips) are thin adhesive strips designed to pull wound edges together. They're named for their distinctive shape—narrow in the middle with wider adhesive ends resembling butterfly wings.
When to Use Butterfly Strips
Butterfly strips are ideal for:
Small, shallow cuts less than 1 inch long
Clean lacerations with straight edges
Low-tension areas where skin doesn't move significantly
Field first aid when professional medical care isn't immediately available
Minor facial cuts where minimal scarring is desired
Proper Butterfly Strip Application Technique
Step 1: Clean the Wound
Thoroughly irrigate the wound with clean water or saline solution. Remove any debris, dirt, or foreign material. Pat dry with sterile gauze.
Step 2: Control Bleeding
Apply direct pressure until bleeding stops. Butterfly strips won't adhere properly to actively bleeding wounds.
Step 3: Prepare the Skin
Ensure skin around the wound is completely dry. Some protocols recommend applying tincture of benzoin to improve adhesion, but this isn't always necessary.
Step 4: Apply Strips Perpendicular to the Wound
Place butterfly strips across the wound at 90-degree angles, spacing them about 1/8 to 1/4 inch apart. Start in the middle and work outward.
Step 5: Bring Edges Together
As you apply each strip, gently pull wound edges together so they're flush but not overlapping. Avoid excessive tension that could cause tissue damage.
Step 6: Secure and Protect
Once strips are in place, you can apply a sterile dressing over them for additional protection.
Limitations of Butterfly Strips
Butterfly strips are not appropriate for:
Deep wounds requiring internal closure
Wounds longer than 1 inch
Jagged or irregular wound edges
High-tension areas (joints, hands, feet)
Heavily contaminated wounds
Wounds with significant bleeding
Steri-Strips: Enhanced Wound Closure Strength
Steri-Strips are a modern evolution of butterfly strips, offering superior adhesive strength and wound closure capability. These reinforced adhesive strips provide continuous bonding along the wound length.
Advantages of Steri-Strips Over Butterfly Strips
Stronger Adhesive
Steri-Strips use medical-grade adhesive that maintains bond strength even in moist conditions or with minor movement.
Better Wound Approximation
The continuous adhesive surface provides more consistent wound edge alignment compared to butterfly strips' narrower contact points.
Reduced Re-Opening Risk
Steri-Strips are less likely to separate or allow wound edges to gap during healing.
Longer Wear Time
They can remain in place for 5-10 days, gradually falling off as the wound heals underneath.
Lower Infection Rates
The porous design allows wound drainage while maintaining closure, reducing infection risk.
When to Choose Steri-Strips
Steri-Strips are excellent for:
Cuts up to 1-2 inches in length
Surgical incision reinforcement
Areas with moderate tension
Situations requiring longer-term closure
Wounds where suture removal would be difficult
Steri-Strip Application Best Practices
Application technique is similar to butterfly strips, with these additional considerations:
Ensure skin is completely dry and oil-free
Apply strips with slight tension to maintain wound edge contact
Overlap strips slightly at wound ends for reinforcement
Avoid getting strips wet for the first 24-48 hours
Allow strips to fall off naturally rather than removing them
Surgical adhesives (tissue glue or liquid stitches) represent a significant advancement in wound closure technology. These medical-grade cyanoacrylate adhesives bond skin edges together without needles, sutures, or staples.
Benefits of Surgical Glue
Pain-Free Application
No needles or sutures means no injection pain or tissue trauma from needle punctures.
Faster Application
Surgical glue can be applied in seconds, making it ideal for pediatric patients or time-sensitive situations.
Waterproof Barrier
Once dry, surgical glue creates a waterproof seal that protects the wound while allowing normal hygiene.
Antimicrobial Properties
Many surgical adhesives have inherent antimicrobial properties that reduce infection risk.
No Removal Required
The glue naturally sloughs off as the wound heals, eliminating the need for suture removal appointments.
Minimal Scarring
Without suture puncture marks, surgical glue often produces less visible scarring than traditional stitches.
Proper Surgical Glue Application
1. Prepare the Wound
Clean thoroughly and ensure complete hemostasis (bleeding control). The wound must be completely dry.
2. Approximate Wound Edges
Manually hold wound edges together in proper alignment. Consider using Steri-Strips first for additional support.
3. Apply Thin Layer
Apply a thin, even layer of adhesive along the wound length. Avoid getting glue inside the wound.
4. Hold Position
Maintain wound edge approximation for 30-60 seconds while the adhesive sets.
5. Apply Additional Layers
Apply 2-3 thin layers, allowing each to dry before adding the next, for maximum strength.
Dissolvable (absorbable) sutures represent the latest advancement in wound closure technology. These specialized threads gradually break down and are absorbed by the body, eliminating the need for suture removal.
How Dissolvable Sutures Work
Absorbable sutures are made from materials like polyglycolic acid, polylactic acid, or catgut that naturally degrade through hydrolysis or enzymatic action over weeks to months.
Advantages of Dissolvable Sutures
No Removal Required
Patients don't need follow-up appointments for suture removal, reducing healthcare costs and patient inconvenience.
Ideal for Internal Closure
Perfect for closing deeper tissue layers, muscle, or subcutaneous tissue where removal would be impossible.
Reduced Infection Risk
No suture removal means no opportunity to introduce bacteria during the removal process.
Pediatric-Friendly
Children don't experience the anxiety or discomfort of suture removal.
Consistent Healing
Sutures maintain strength during critical healing phases, then dissolve as tissue regains integrity.
When Dissolvable Sutures Are Used
Medical professionals use absorbable sutures for:
Deep lacerations requiring layered closure
Surgical incisions (internal and external)
Oral or mucosal wounds
Pediatric wound closure
Areas where suture removal would be difficult
Patients who cannot return for follow-up care
Important Considerations
Dissolvable sutures require professional medical placement and are not part of standard first aid kits. However, understanding their role helps you recognize when professional medical care is necessary rather than field treatment.
Choosing the Right Wound Closure Method
Selecting appropriate wound closure technique depends on multiple factors:
Decision Matrix
For Small, Shallow Cuts (< 1 inch, minimal depth):
First choice: Butterfly strips or Steri-Strips
Alternative: Surgical glue
Seek medical care if: Wound won't stay closed or shows signs of infection
For Medium Cuts (1-2 inches, moderate depth):
First choice: Steri-Strips with surgical glue reinforcement
Alternative: Professional sutures
Seek medical care if: Wound is deep, gaping, or in high-tension area
For Large or Deep Wounds (> 2 inches or full-thickness):
Required: Professional medical care for sutures or staples
Field treatment: Control bleeding, cover with sterile dressing, transport to medical facility
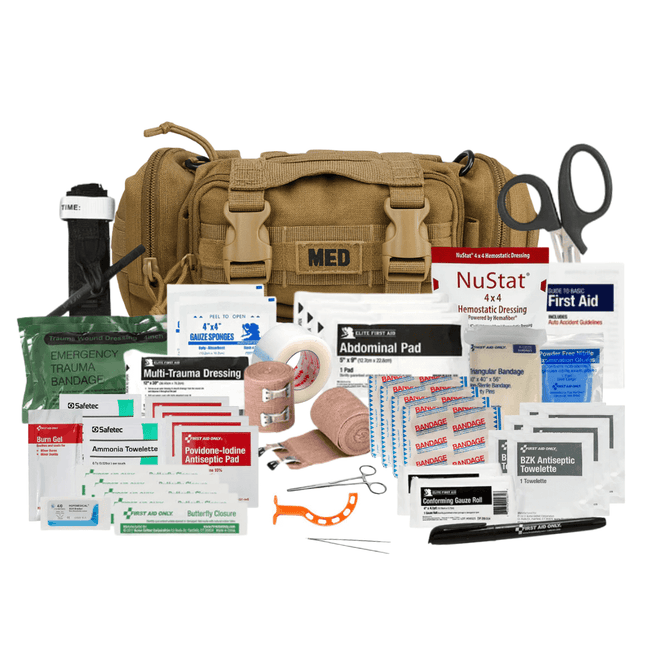
Essential Wound Closure Supplies for Your Kit
A comprehensive trauma kit should include multiple wound closure options:
Recommended Supplies
Butterfly strips (various sizes)
Steri-Strips (1/4 inch and 1/2 inch widths)
Surgical adhesive (small tube or ampules)
Sterile gauze pads for wound cleaning and dressing
Antiseptic wipes or solution
Medical tape for securing dressings
Sterile saline for irrigation
Gloves for infection control
Scissors for cutting strips and tape
When to Seek Professional Medical Care
Some wounds require professional evaluation and treatment. Seek medical care for:
Wounds showing signs of infection (redness, warmth, pus, fever)
Wounds that won't stop bleeding after 10 minutes of direct pressure
Wounds over joints or in high-tension areas
Any wound you're uncertain how to treat
Wound Closure Best Practices
Regardless of which closure method you use, follow these universal principles:
Clean thoroughly: Irrigation removes bacteria and reduces infection risk
Control bleeding first: Closure methods won't work on actively bleeding wounds
Approximate edges carefully: Edges should touch but not overlap
Avoid excessive tension: Too-tight closure can damage tissue and impair healing
Monitor for infection: Check daily for increased redness, warmth, or drainage
Keep clean and dry: Protect closed wounds from contamination
Follow up appropriately: Seek medical evaluation if healing doesn't progress normally
The Evolution Continues: Future of Wound Closure
Wound closure technology continues advancing with innovations like antimicrobial adhesives, smart sutures that monitor healing, and bioengineered skin substitutes. These developments promise even better outcomes with less scarring and faster healing.
However, the fundamental principles remain constant: proper wound preparation, appropriate technique selection, and careful application determine success regardless of which advanced technology you use.
Equip Your Kit with Professional Wound Closure Supplies
At ViTAC Solutions, we provide professional-grade wound closure supplies and comprehensive emergency medical kits trusted by first responders, outdoor professionals, and prepared civilians nationwide.
Our kits include essential wound closure materials alongside complete trauma care supplies—all curated by U.S. Army Green Berets with real-world medical experience.
ViTAC Solutions – Professional-grade medical equipment built by veterans, trusted by professionals. Because proper wound closure can mean the difference between quick healing and serious complications.
In Stock. Ready to Ship.
Domestic Shipping (USA - Lower 48 Only) Orders are processed within 24 hours and typically ship within 1–2 business days. Once shipped, delivery takes an estimated 3–7 days, with most orders arriving in just 5 days. Please Note: We currently do not ship to Alaska, Hawaii, or international destinations. Questions? Contact us anytime at support@vitacsolutions.com or call 307-202-8426.
Are you making the right choice when buying IFAK trauma kits? This post highlights the crucial differences between budget and quality options, focusing on components...
5 Things You Need to Know Before You Buy a First Aid Kit
Before buying a first aid kit, ensure it suits your specific needs, contains essential trauma supplies, and is backed by reliable support. Discover key factors...
Discover essential items every Car Trauma Kit Essentials should include to effectively control severe bleeding after an accident. Learn the importance of training and how...
Community Preparedness: How Public Safety Leaders Build Resilient Neighborhoods
Community preparedness starts with strong leadership. This comprehensive guide empowers law enforcement officers, veterans, first responders, and civic leaders to organize emergency training, build volunteer...
Trusted by Law Enforcement & Tactical Professionals
Our Mission.
We've been downrange. We know what it costs to be unprepared. ViTAC was built by U.S. Army Special Operations veterans to make sure the people who run toward the threat — and the families who depend on them — have gear that works when everything is on the line.
— ViTAC Solutions Founders | 40+ years combined Special Operations experience
Most of our trauma kits and first aid supplies qualify for HSA and FSA reimbursement. Don't let your benefits expire — invest them in gear that could save a life.
What are you preparing for? On-duty response, family preparedness, outdoor adventure... Answer 5 quick questions and we'll match you with the right gear.
Hello thank you for putting out a affordable kit we were spending a lot of money on MYMEDIC kits but I think you changed my mind
Hi Joey, thank you so much for taking the time to leave us a review. We're thrilled to hear that our kit has made a positive impression on you. We strive to provide high-quality, affordable options for our customers, and we're happy to have changed your mind about other brands. Stay safe out there!