Trusted by Law Enforcement & Tactical Professionals
When EMS Is 30 Minutes Out: The Trauma Supplies You Need to Carry
10 min reading time
Learn about essential trauma supplies when EMS is far away. Essential gear for severe bleeding, chest injuries, and more.
The average EMS response time in rural U.S. environments is 14 minutes. In backcountry terrain, that number extends to 30 minutes or more — and in some scenarios, evacuation is measured in hours. In those windows, the injured person lives or dies based on what the people on scene can do with what they have. This guide covers the specific supplies required when professional help is not close, what each item does, and how to configure them for rapid deployment.
Essential Trauma Supplies When EMS Is Far Away
Tourniquets for Limb Arterial Bleeds
Arterial hemorrhage from a limb is fatal in minutes without intervention. A windlass tourniquet applied correctly stops arterial blood flow completely. The CAT GEN 7 | Combat Application Tourniquet is the TCCC Committee standard and the device issued to U.S. military personnel. It is designed for one-handed self-application, features a stabilizing plate that prevents rod slip under pressure, and has a documented failure rate near zero with correct application. Carry a minimum of two when operating in remote environments — one for self-aid, one for a second casualty. Stage both where they can be accessed with the non-dominant hand. Practice deployment until the application time is consistently under 30 seconds.
Hemostatic Gauze for Junctional Wounds
Junctional wounds — groin, axilla, neck — cannot be addressed with a tourniquet. They require direct wound packing with hemostatic gauze. The QuikClot Combat Gauze Z-Fold is kaolin-impregnated, accelerates clotting without exothermic reaction, and is Z-fold packaged for single-handed deployment. Pack the wound firmly to the base, hold direct pressure for three full minutes, then secure. Packing too loosely does not compress the bleeding vessel and fails to achieve hemostasis. For more on wound packing technique, see Bleeding Control Basics: Why You Need Hemostatic Gauze.
Pressure Dressings to Maintain Hemostasis
After tourniquet application or wound packing, a pressure dressing maintains compression and secures the gauze in place. A quality pressure dressing has a built-in pressure bar that allows continuous compression without requiring the responder to manually maintain force. Stage pressure dressings accessible immediately after hemostatic gauze in the kit — wound packing without subsequent pressure maintenance loses hemostatic benefit rapidly.
Field Note: Carry Two of Everything — Multi-Casualty Is Real
Carry at least two of each primary hemorrhage control item in any remote environment: two tourniquets, two hemostatic gauze packs, two pressure dressings. Multi-casualty incidents and two-wound scenarios on a single patient both require duplicate supplies that a single-item kit cannot address.
Penetrating Chest Injuries
Vented Chest Seals for Open Pneumothorax
Penetrating chest wounds — from firearms, sharp objects, or impalement — allow air to enter the pleural space, collapsing the lung. Untreated, this progresses to tension pneumothorax as trapped air shifts the mediastinum. Vented chest seals address this with a one-way valve that allows air to exit during exhalation but prevents re-entry during inhalation. Apply over any penetrating chest wound: two seals, one anterior and one posterior if both entry and exit wounds are accessible, or both anteriorly if entry only. The Premium IFAK Trauma Kit w/Tourniquet & Chest Seals includes vented chest seals as part of a complete hemorrhage-plus-thoracic configuration.
Occlusive Seals as Backup
Non-vented occlusive seals create a complete barrier over a wound without the one-way valve mechanism. They are appropriate when vented seals are not available, but carry a risk of tension pneumothorax if air accumulates in the pleural space without an exit pathway. Vented seals are the correct specification for field use in any kit intended for remote environments. If only occlusive seals are available, monitor the patient for worsening respiratory distress and be prepared to briefly lift a corner of the seal to release trapped air.
Field Note: Dry the Skin Before Sealing
Seal adhesion on a bloody or sweaty chest is a known challenge in field conditions. Dry the skin around the wound with gauze before applying. If adhesion fails, hold the seal in place manually until evacuation. A seal that does not stick provides no benefit.
Personal Protection and Tools
Nitrile Gloves
Every intervention begins with gloves on. Nitrile gloves provide barrier protection against bloodborne pathogens and reduce contamination risk to the wound. Pack a minimum of four pairs per responder — gloves are compromised rapidly during wound care and may need to be changed between interventions. Latex is an acceptable alternative for individuals without latex sensitivity but is a contraindication risk in patients with unknown allergy history. Stage at the very top of the kit as the first item accessed on every incident.
Trauma Shears
Trauma shears cut through clothing, boots, and seatbelts without skin contact. The blunt lower blade protects the patient while the upper blade provides cutting force. Access to the wound is required before hemorrhage control can be initiated — trauma shears eliminate the time penalty of cutting around seams or removing gear. Keep them clipped to a belt or accessible pocket, not inside the kit. Retrieval time from inside a bag under stress is a preventable delay.
Permanent Marker
Record tourniquet application time directly on the tourniquet strap or on the patient's skin proximal to the device. Write the time in 24-hour format. This information determines the evacuation urgency and informs receiving medical personnel on limb viability and reperfusion risk. A tourniquet applied at an unknown time is a tourniquet with unknown downstream risk. The marker costs nothing and weighs nothing — it belongs in every kit.
Preventing Hypothermia and Shock
Emergency Blankets
Hemorrhage patients lose core body temperature rapidly. Hypothermia accelerates coagulopathy — the body's inability to clot effectively — creating a feedback loop where cold worsens bleeding and bleeding worsens cold. Mylar emergency blankets reflect body heat at a reported 90% efficiency rate and fold to a palm-sized package. Stage one in every remote kit. Apply to any hemorrhage patient after hemorrhage control is established. The MARCH H — Hypothermia — is not a secondary concern in extended care situations; it is a primary life threat.
Extended Cold-Environment Protection
In environments where ambient temperature is below 50°F or the patient is wet, a bivy sack or full-body insulated cover provides materially better protection than a Mylar blanket alone. For remote camping and backcountry operations in shoulder seasons or at elevation, include a compact bivy sack alongside the emergency blanket. This combination addresses the full range of thermal threat from mild shock in warm conditions to severe exposure in cold environments.
Kit Organization and Reference
MARCH Reference Card
A laminated card outlining the MARCH protocol — Massive hemorrhage, Airway, Respiration, Circulation, Hypothermia — provides a stress-resistant sequence reference. Under high cognitive load, the protocol serves as an error-prevention tool. Keep the card waterproof and positioned where it can be read quickly. Print the MARCH sequence with brief action items under each letter: M — tourniquet or wound pack; A — check airway, clear or position; R — chest seals, needle decompression if trained; C — reassess circulation, IV access if trained; H — insulate, emergency blanket.
Labeling and Waterproofing
Label every compartment. Use waterproof labels or permanent marker on durable tape. Priority items — tourniquet, gauze, gloves — belong at the top layer, accessible without opening a secondary compartment. Waterproof the container for any remote or outdoor use. Hemostatic gauze exposed to moisture loses clotting efficacy. Chest seals with compromised adhesive backing fail at application. Protect them.
Practice and Maintenance
Practice tourniquet application one-handed under time pressure. The target is under 30 seconds from kit access to correct application. Practice wound packing with the hemostatic gauze you carry, with three full minutes of direct pressure maintained. Practice chest seal application on a simulator or training aid to confirm adhesion technique before the application matters. Quarterly drills maintain the skill level that initial training established.
Inspect the kit quarterly. Verify expiration dates on hemostatic gauze and chest seals. Check tourniquet strap and windlass condition. Replace any item used in training immediately — a partial kit returned to service is a failed kit at the point of need. Stack items in MARCH priority order after every inspection so the sequence remains consistent.
Frequently Asked Questions
What is the most important item in a trauma kit when EMS is far away?
A windlass tourniquet is the single most important item for extremity hemorrhage control. Combined with hemostatic gauze for junctional wounds, these two items address the primary cause of preventable death in the pre-hospital window: severe bleeding. Neither substitutes for the other — both are required.
Why is hemostatic gauze necessary if I have a tourniquet?
Tourniquets work only on limbs. Junctional wounds in the groin, axilla, or neck cannot accept a tourniquet. Hemostatic gauze packed directly into these wounds accelerates clotting and controls hemorrhage in locations where a tourniquet is anatomically impossible. Both items address different wound locations and neither replaces the other.
What is a vented chest seal and when is it used?
A vented chest seal covers a penetrating chest wound and provides a one-way valve that allows air to exit the pleural space during exhalation while preventing air from entering during inhalation. It is used for any penetrating chest wound — gunshot, stab, or impalement. Apply two: one over the entry wound, one over the exit wound if accessible.
Why does tourniquet application time need to be documented?
Duration of tourniquet application determines limb viability risk. Medical personnel receiving the patient need to know when the device was applied to assess reperfusion risk, decide on timing of tourniquet removal, and plan surgical intervention. An unknown application time eliminates critical decision-making data for the receiving team.
What else should a remote trauma kit include beyond bleeding control?
Vented chest seals, nitrile gloves, trauma shears, permanent marker, emergency blanket, and a MARCH reference card complete the remote trauma kit baseline. In cold environments or extended care scenarios, add a bivy sack for thermal management. The bleeding control items address the first priority; the supporting items address the downstream complications that develop while waiting for evacuation.
How often should a remote trauma kit be inspected?
Quarterly. Check expiration dates on hemostatic gauze, chest seals, and gloves. Verify tourniquet strap and windlass function. Replace anything used since the last inspection. Stack items in MARCH priority order after every inspection. A kit that has not been inspected since the last use may have missing components at exactly the moment they are needed.
Bottom Line
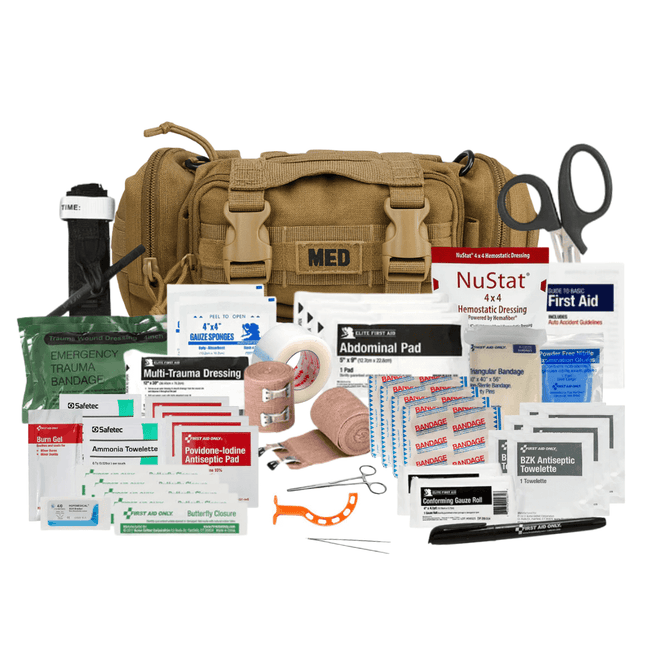
When EMS is 30 minutes out, the interval between injury and professional care depends entirely on the supplies on scene and the skill of the person using them. The non-negotiable baseline: a windlass tourniquet, hemostatic gauze, pressure dressing, vented chest seals, gloves, trauma shears, permanent marker, and an emergency blanket. The Tactical Trauma Kit w/Rip-Away Feature covers this baseline in a format designed for fast deployment in remote environments.
In Stock
Domestic Shipping (USA - Lower 48 Only) Orders are processed within 24 hours and typically ship within 1–2 business days. Once shipped, delivery takes an estimated 3–7 days, with most orders arriving in just 5 days. Please Note: We currently do not ship to Alaska, Hawaii, or international destinations. Questions? Contact us anytime at support@vitacsolutions.com or call 307-202-8426.
What are you preparing for? On-duty response, family preparedness, outdoor adventure... Answer 5 quick questions and we'll match you with the right gear.
Cold environments demand deliberate gear decisions. This guide covers the three-layer system — base, mid, and shell — from a preparedness standpoint: how each layer...
Identify Fake Gear: Ensuring Your Trauma Kits Meet TCCC Standards
Counterfeit CAT tourniquets fail under pressure. TCCC-standard gear has specific markings, materials, and testing — here's how to verify before your kit is tested for...
Uncontrolled bleeding is the leading cause of preventable trauma death. EMS averages 14 minutes nationally. A firearm stops the threat — only a trauma kit...
We've been downrange. We know what it costs to be unprepared. ViTAC was built by U.S. Army Special Operations veterans to make sure the people who run toward the threat — and the families who depend on them — have gear that works when everything is on the line.
— ViTAC Solutions Founders | 40+ years combined Special Operations experience
Most of our trauma kits and first aid supplies qualify for HSA and FSA reimbursement. Don't let your benefits expire — invest them in gear that could save a life.
The item was as promised. Everything in the kit was high-quality and I’m pleased with that. The only problem I have is I’m not sure it’s worth the cost. I found all of the contents individually for significantly less money. The only thing I didn’t find on my own was the pouch everything came in and that was a perfect fit so I would give it an A plus on quality, but a C on value.